How we test a web framework

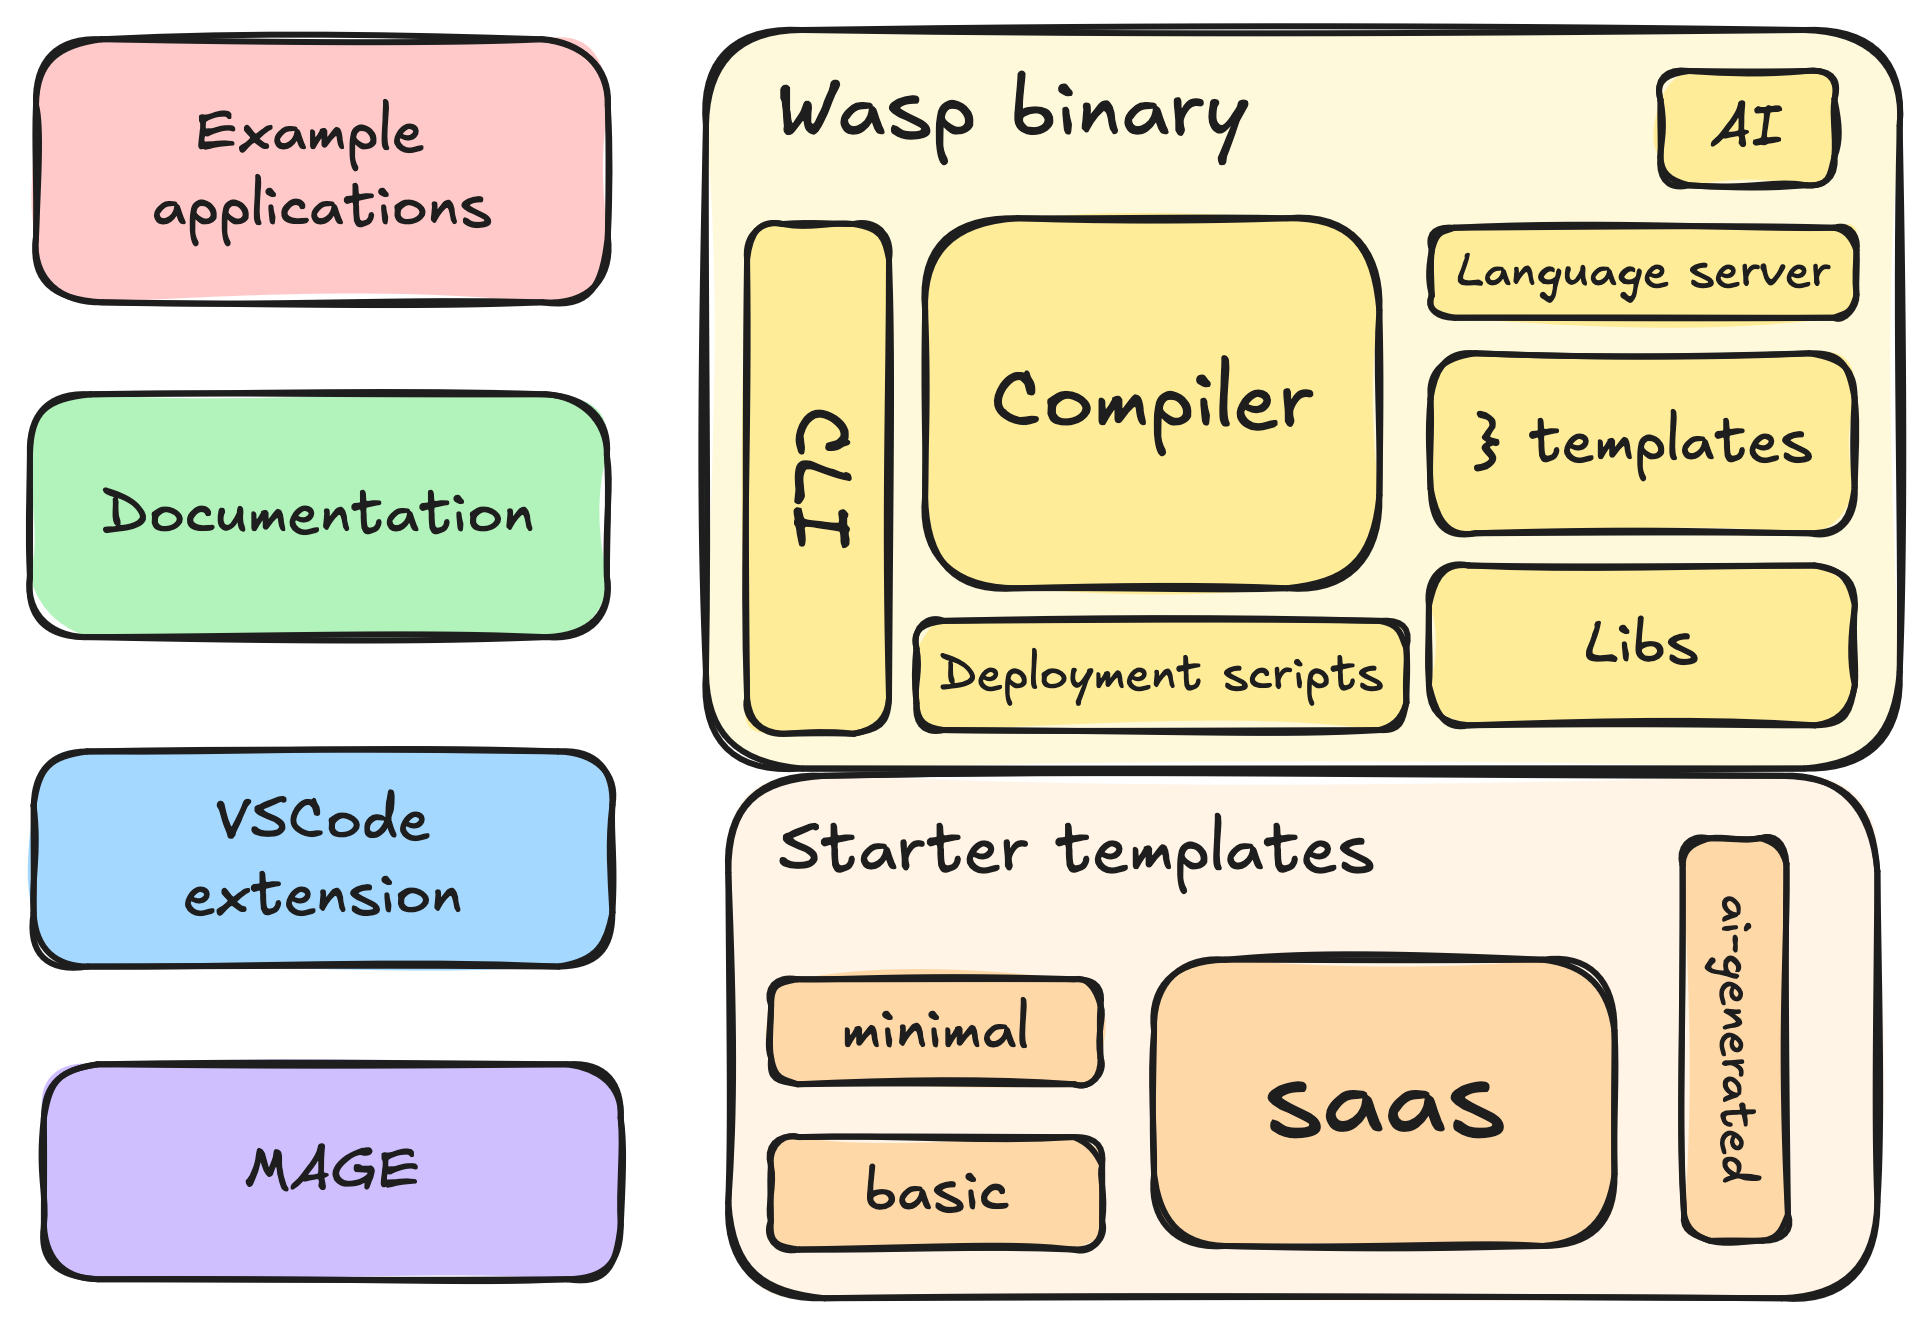
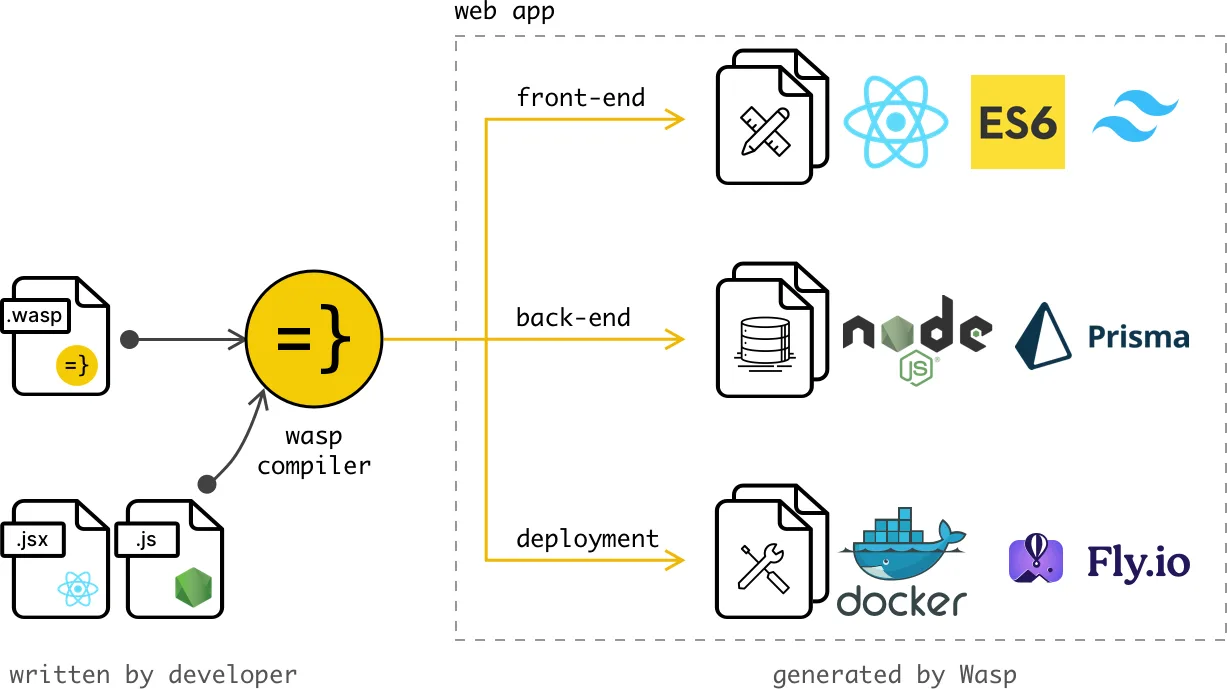
Wasp is a compiler-driven full-stack web framework; it takes configuration and source files with your unique logic, and it generates the complete source code your the web app. Think of a Rails-like framework for React, Node.js and Prisma.
As a result of our approach and somewhat unique design, we have a large surface area to test. Every layer can break in its own creative way, and a strong suite of automated tests is what keeps us (somewhat) sane.
In this article, our goal is to demonstrate the practical side of testing in a compiler-driven full-stack framework, where traditional testing intersects with code generation and developer experience.
Our approach to tests
If we wanted to reduce our principle to a single sentence, it would be: We believe that test code deserves the same care as production code.
Bad tests slow you down. They make you afraid to change things. So our principle is simple: if a piece of test code matters enough to catch a bug, it matters enough to be well-designed. We refactor it. We name things clearly. We make it easy to read and reason about.
It’s not new or revolutionary; it’s just consistent care, applied where most people stop caring.
Tests that explain themselves
Our guiding principle is that tests should be readable at a glance, without requiring an understanding of the machinery hiding underneath. That’s why we write them so that the essence of the test, the input and expected output, comes first. Supporting logic and setup details follow afterward, only for those who need to understand the details.
spec_kebabToCamelCase :: Spec
spec_kebabToCamelCase = do
  "foobar" ~> "foobar"
  "foo-bar-bar" ~> "fooBarBar"
  "foo---bar-baz" ~> "fooBarBaz"
  "-foo-" ~> "foo"
  -- ...
  "--" ~> ""
  "" ~> ""
  where
    kebab ~> camel = it (kebab ++ " -> " ++ camel) $ do
      kebabToCamelCase kebab `shouldBe` camel
That rule naturally connects to the next one: tests should be descriptive enough that you can understand their essence without additional comments. That’s why sometimes we end up with beautifully long descriptions like this:
spec_WriteFileDrafts :: Spec
spec_WriteFileDrafts =
  describe "fileDraftsToWriteAndFilesToDelete" $ do
    it "should write and delete nothing if there are no checksums and no file drafts" $
    -- ...
    it "should write new (not in checksums list) and updated (in checksums list but different checksum) files drafts and delete redundant files (in checksums but have no corresponding file draft)" $ do
    -- ...
The nice thing about writing tests in Haskell is how easy it is to build tiny DSLs that make tests readable. And for us, reading code is much more important than writing it; we even leaned into Unicode operators for math operations. But the boundary between clarity and productivity can be tricky when you realize nobody remembers how to type “⊆”.
  describe "isSubintervalOf" $ do
	  -- ...
    [vi| [4, inf) |] ⊆ [vi| [3, inf) |] ~> True
    [vi| (3, inf) |] ⊆ [vi| [3, inf) |] ~> True
	  -- ...
    [vi| (inf, inf) |] ⊆ [vi| (inf, inf) |] ~> True
    [vi| [2, 2.5) |] ⊆ [vi| (1, 2.6] |] ~> True
Courage not coverage
Chasing 100% coverage is fun. It’s complete. But it’s also hard to do. It can push you to spend time testing code paths that don’t really matter. It looks good in the report, but while getting there, you miss out on testing potentially important stuff.
The goal is that our combined tests catch nearly all meaningful errors. We aim for “courage”. Confidence that if something breaks, we’ll know fast.
TDD (but not the one you think)
We've always liked the idea of test-driven development, but it never really stuck for us. In practice, we’d start coding and only after something worked, would we add tests.
One thing we love is strong typing (we use TypeScript and Haskell), describing what the feature should look like and how data should flow. Once the types make sense, the implementation becomes straightforward. It’s leaning on the compiler to guide you along the way. For us, that rhythm feels more natural, the Type-Driven Development.
Testing the compiler
At the core of our framework sits the compiler, written in Haskell. It takes a configuration file and user source code as input, and it assembles a full-stack web app as output.
Although Haskell has excellent reliability and type safety (e.g., check out our library for type-safe paths), tests are still necessary. We use unit tests to ensure our compiler’s logic is correct. But the compiler’s most important product is the generated code that exists outside the Haskell domain. To verify the generated code, we use the end-to-end (e2e) tests.
Our E2E tests story
The purpose of our e2e tests is to verify that the Wasp binary works as expected. We are not concerned with the internal implementation, only its interface and outputs.
The interface is the Wasp CLI (called waspc). Every command is treated as a black box: we feed it input, observe its side effects, and verify the output.
The primary output of waspc is a Wasp app. So we validate that each command correctly generates or modifies an app. Secondary outputs are installer behavior, uninstall flow, bash completions, etc.
Tracking each and every change
Wasp generates a considerable amount of code, and even small compiler tweaks can cause the weirdest changes in the output — a real-life butterfly effect. We want to be sure that each PR doesn't cause any unexpected changes.
Snapshot tests are the crown jewel of our e2e story. We use it to track the compiler’s code generation changes in the form of golden vs current snapshots. We test the actual (current) output vs. the expected (golden) output.
They are an efficient way to gain high confidence in the generated output with relatively little test code, a good fit for code generation. Because we track golden snapshots with Git, every pull request clearly shows how the generated code changes.
To make it clear what we are testing, we build our test cases from simple:
waspNewSnapshotTest :: SnapshotTest
waspNewSnapshotTest =
  makeSnapshotTest
    "wasp-new"
    [createSnapshotWaspProjectFromMinimalStarter]
To more complex ones, feature by feature (command by command):
waspMigrateSnapshotTest :: SnapshotTest
waspMigrateSnapshotTest =
  makeSnapshotTest
    "wasp-migrate"
    [ createSnapshotWaspProjectFromMinimalStarter,
      withInSnapshotWaspProjectDir
        [ waspCliCompile,
          appendToPrismaFile taskPrismaModel,
          waspCliMigrate "foo"
        ]
    ]
  where
    taskPrismaModel = -- ... details ...
What does this look like in practice? Suppose while modifying a feature, we accidentally added a stray character (e.g., a dot) while editing a Mustache template, which means it will also appear in the generated code. If we now run snapshot tests to compare the current output of the compiler with the golden (expected) one, it will detect the change in the generated files and ask us to review it:
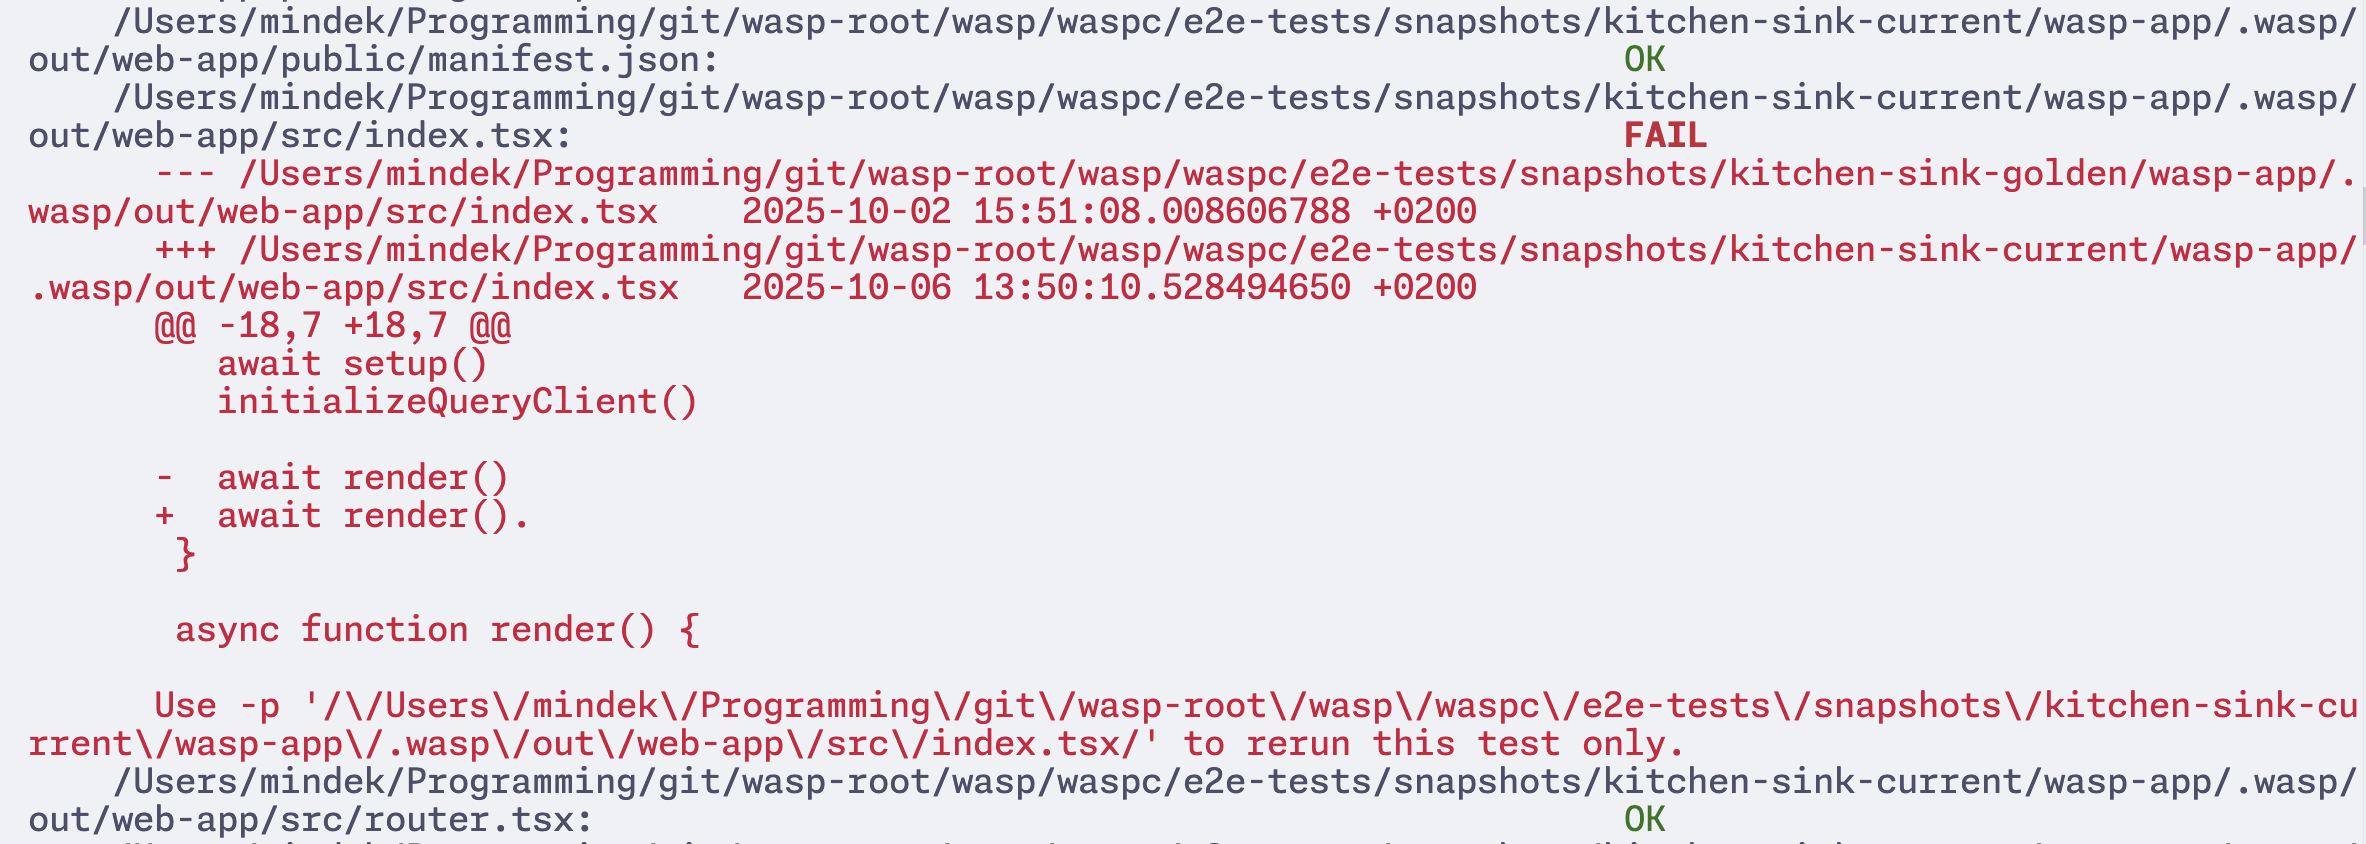
Now we can check the change and accept it if it was expected, or fix it if not. Finally, when we are satisfied with the current snapshot, we record it as a new golden snapshot.
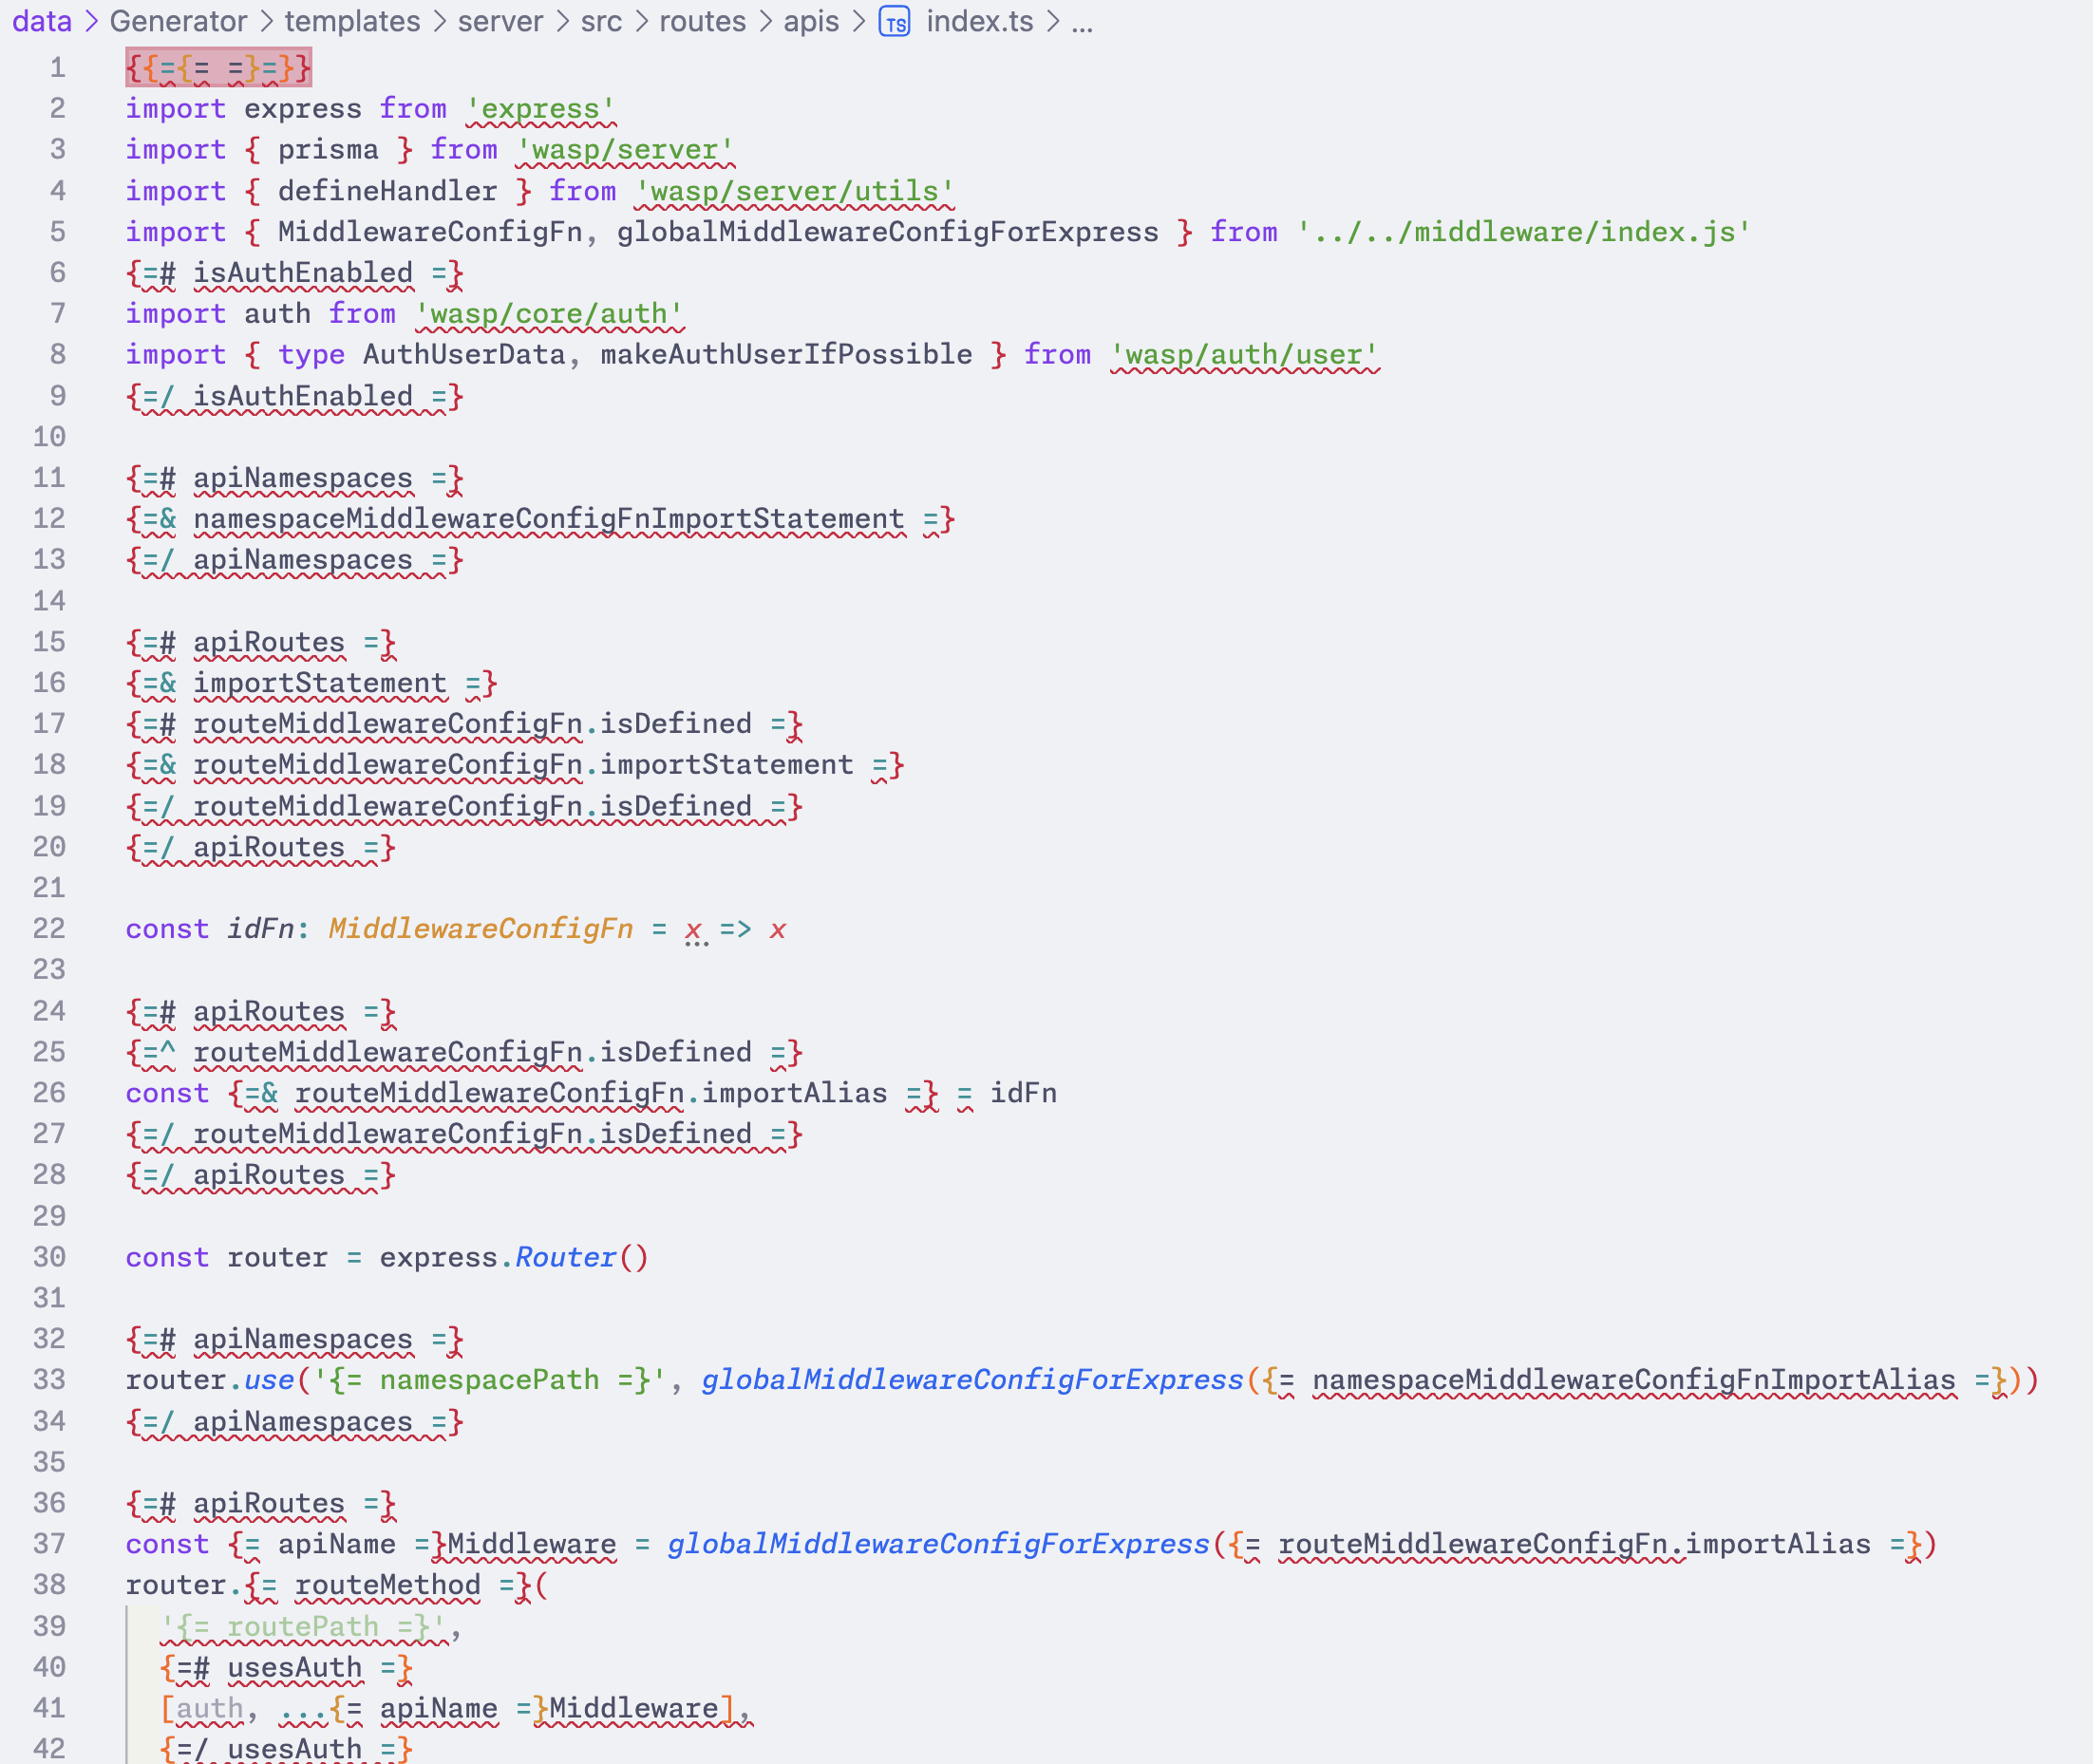
Untangling TypeScript from Mustache
Mustache templates make up the core of our code generation. Any file with dynamic content is a Mustache template, be it TypeScript, HTML, or a Dockerfile. It made sense as we need the compiler to inject them with relevant data.
While this gave us a lot of control and flexibility while generating the code, it also created development challenges. Mustache templates aren’t valid TypeScript, so they broke TypeScript’s own ecosystem: linters, formatters, and tests.
This inconvenience made our usual development workflow consist of generating a Wasp app, making modifications to the generated files, and carrying over the changes back to the template. Repeat the process until we get it right.
That is why we’re migrating most of the TypeScript logic from Mustaches templates into dedicated npm packages. This will leave templates as mostly simple import/export wrappers, while allowing us to build and test the TypeScript side of the source code with full type safety and normal toolqing.
Testing the Wasp apps
Besides the compiler, we also ship many Wasp apps ourselves, including starter templates and example apps. We maintain them and update them together with the compiler. Our goal is to test the Wasp apps in runtime, and we use playwright e2e tests for that.
Starter templates
Typically, every Wasp app starts from a starter template. They are prebuilt Wasp apps that you generate through Wasp CLI to get you started. As they are our first line of UX (or DX?), it's essential to keep the experience as smooth and flawless as possible.
What is most important is to test the starter templates themselves. Each starter represents a different promise that we have to validate. We test their domains rather than the framework itself.
Interestingly, since starter templates are Mustache templates, we can’t test them directly. Instead, we must initialize new projects through the Wasp CLI, on which we run the prebuilt playwright e2e tests.
Example apps
Starter templates get you started, but Wasp features so many more features. To test the entire framework end-to-end, we had to build additional Wasp apps — example apps. They serve a dual purpose: to serve as a public examples of what can be built with Wasp and how, but also as a testing suite on which we run extensive tests.
We test each framework feature with playwright. On each PR, we build the development version of Wasp, and each example app runs its e2e tests in isolation. While golden snapshots provide clarity into code generation changes, these tests serve to ensure none of the framework features' expectations were broken.
Kitchen sink
The kitchen sink app is the "holy grail" of example apps. We test most of the framework features in this single application (smartly named kitchen-sink ). If you’re not familiar with the term “kitchen sink application”, think of it like a Swiss knife for framework features
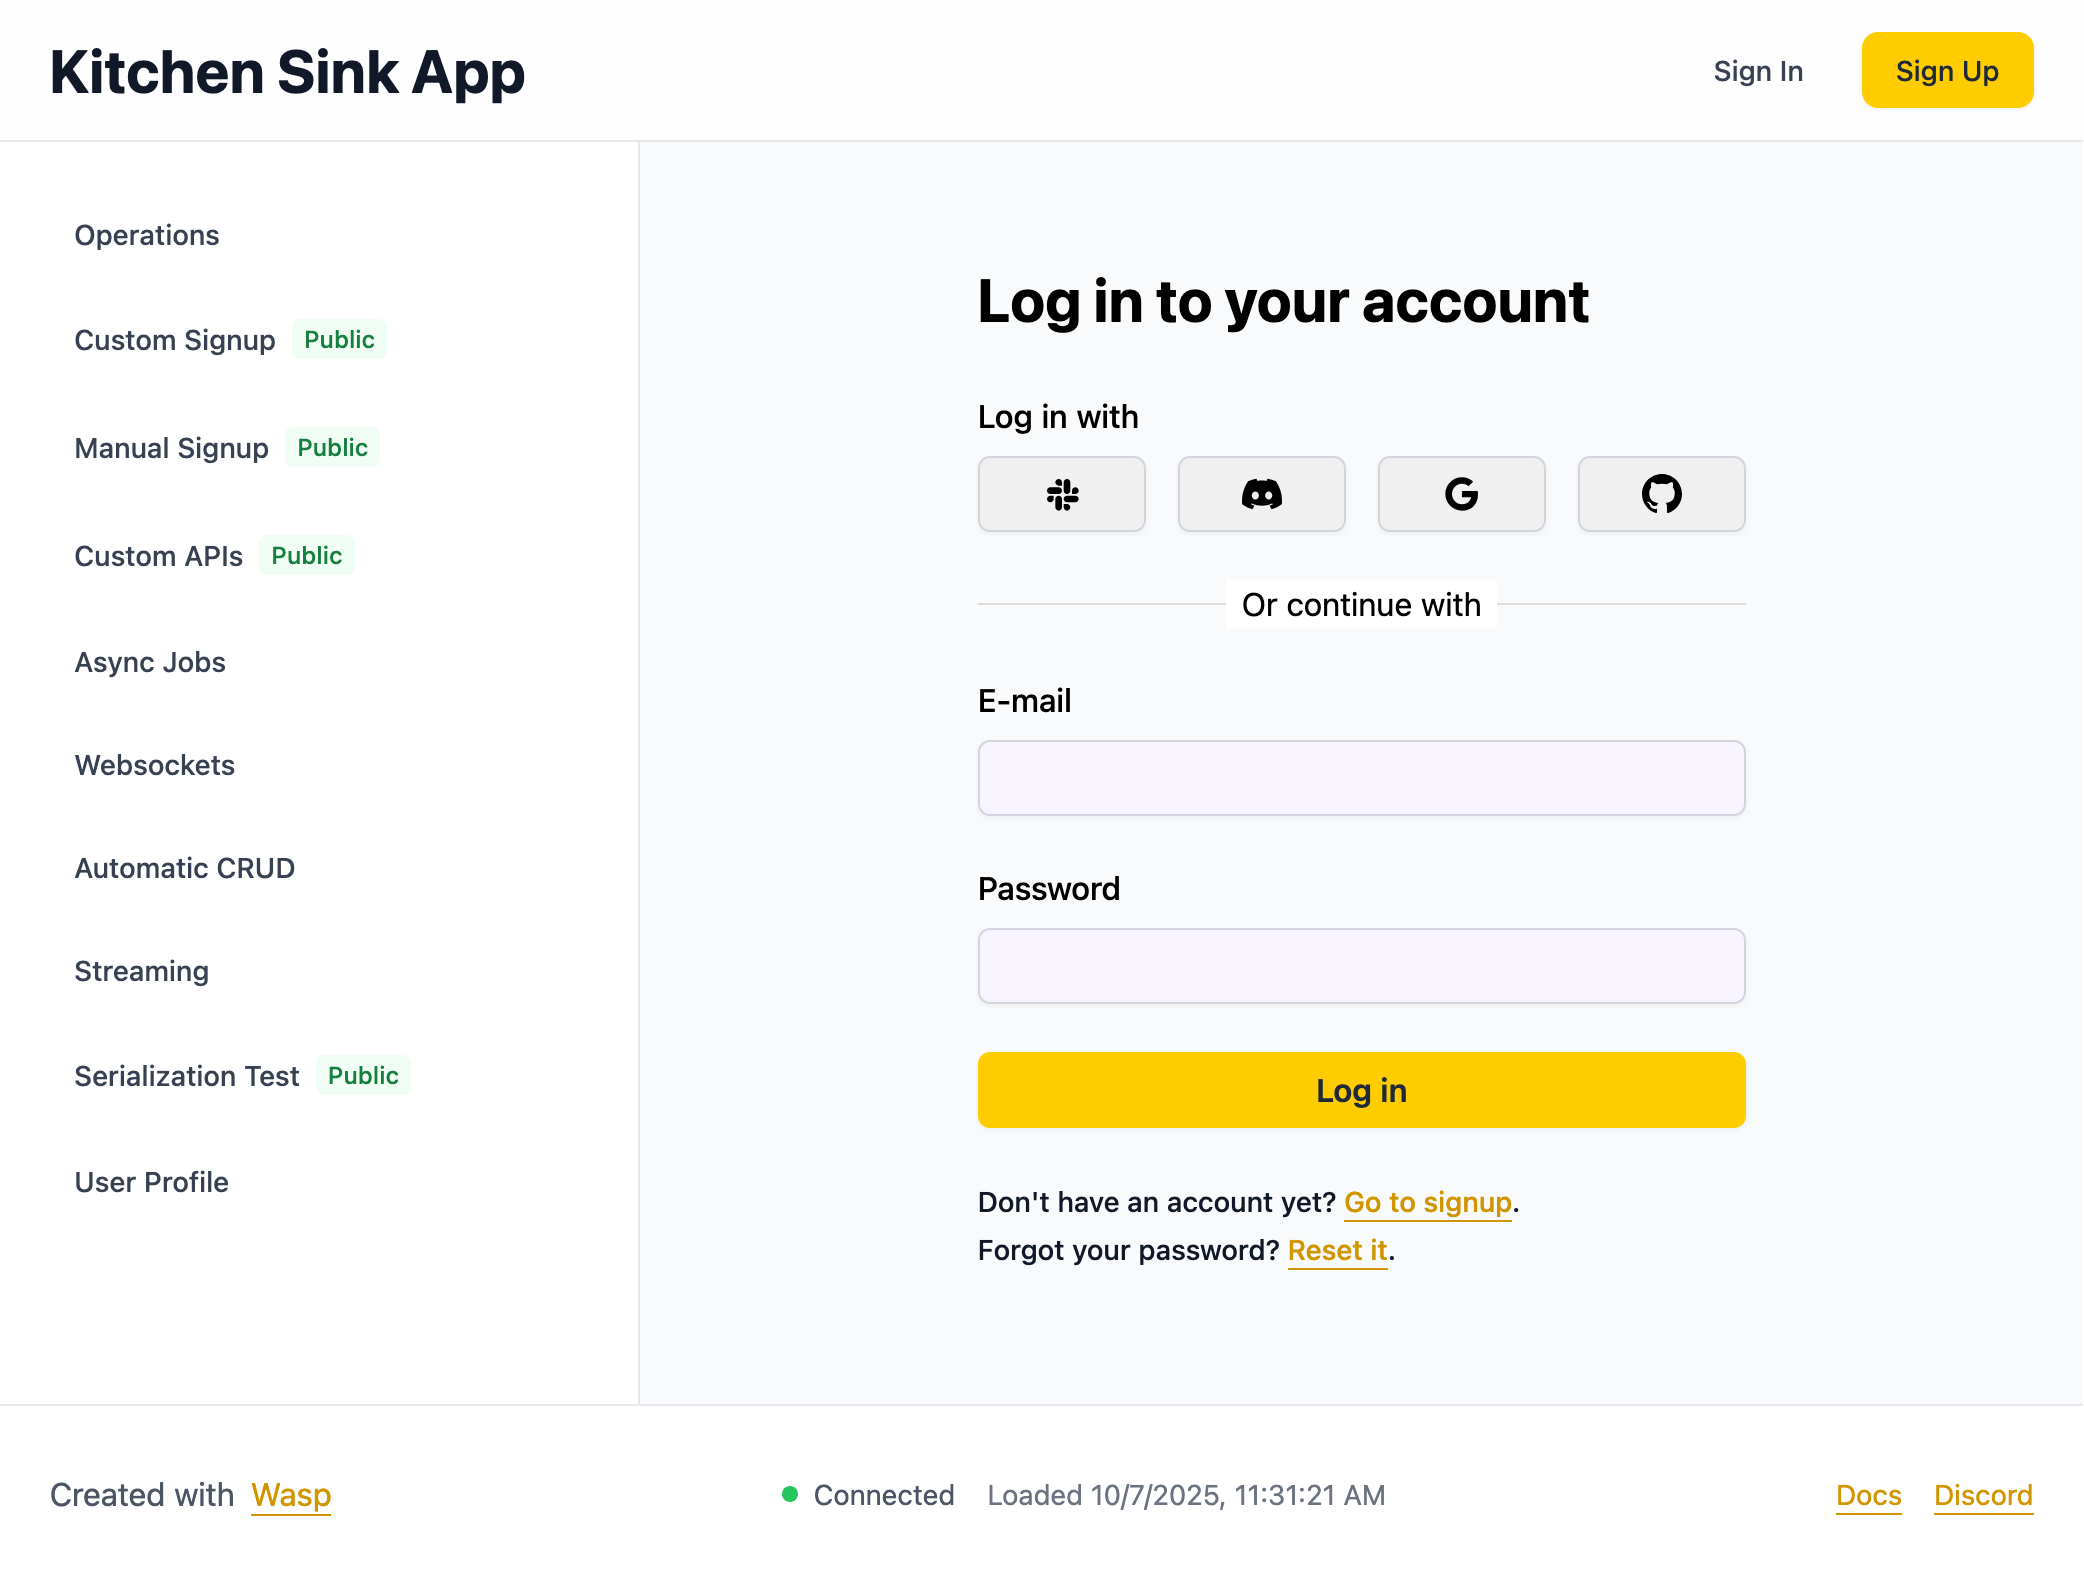
Kitchen sink is also one of the applications we snapshot in our snapshot tests. So, kitchen-sink not only serves to test that the code works in the runtime, but also tracks any changes to the code generation.
We have one golden rule when modifying/adding framework features: “There must be a test in the example applications which covers this feature.”
When Kitchen Sink is not enough (or too much)
Previously, I mentioned that kitchen-sink tests most of the framework features. Most — because Wasp has mutually exclusive features. For example, usernameAndPassword authentication vs email authentication (yes, email authentication also uses a password, I didn’t design the name). So we try to pick up the scraps with the rest of the smaller example apps.
While the kitchen-sink application is suitable for showcasing the framework's power to users, it’s impossible to test all of the features in a single application. Nor is it the proper way to test Wasp end-to-end.
This is how our “variants” idea sparked. The idea is to build variants on top of the minimal starter. E.g., “Wasp app but using SendGrid email sender”, “Wasp app but using Mailgun email sender”…
For each possible feature that exists, a Wasp application of that feature should exist. It's something we haven't yet solved, but we plan to address it as we approach the Wasp 1.0 release. For now, the kitchen-sink app serves us well enough.
Building tools for your tests
Wasp applications are complex systems with many parts: front-end, back-end, database, and specific requirements and differences between the development and production versions of the application. This makes test automation cumbersome.
You can do it, but you really don’t want to repeat the process. So we’ve packaged it into our own driver called wasp-app-runner. It exports two simple commands: dev and build. It’s not suitable for development purposes (nor deployment), but for testing, it’s perfect. Tooling for your tests is tooling for your sanity.
Testing the deployment
Wasp CLI can automatically deploy your Wasp applications to certain supported providers. You set the production environment variables, and the command does everything else.
To ensure deployment continues to work correctly, each code merge on the Wasp repository triggers a test deployment of the kitchen-sink example app using the development version of Wasp, followed by basic smoke tests on the client and server to confirm everything runs smoothly. Finally, we clean up the deployed app.
When releasing a new version of our framework, we follow the same procedure described above, but for all the example apps, not just the kitchen-sink one: we redeploy their test deployments using this new version of the framework. However, these deployments remain permanent, as we use example apps to showcase Wasp to users.
Testing the docs (kind of)
APIs change fast, in a startup building a pre-1.0 framework. Documentation lags even faster. You tweak a feature, push the code, and somewhere, a forgotten code example still lies.
We’re careful about updating documentation when features change, but some references hide in unexpected corners. It’s a recurring pain: docs are the primary way developers experience your tool, yet they’re often the easiest part to let rot. So we started treating documentation more like code.
Keeping code examples honest
You modify a feature, update the API, but some part of the docs still shows an old example. Users (and I) prefer copy-pasting examples over reading API documentation. We copy and paste broken snippets and expect things to work, but they don’t.
Wouldn’t it be nice if docs’ code examples were also tested like Wasp app examples? Why not combine the two?
We agreed that the docs examples must reference the source code of example apps. Each code snippet in the docs must declare a source file in one of the example apps where that same code resides (with some caveats). We can automatically verify that the reference is correct and the code matches; if not, the CI fails.
We are implementing this as a Docusaurus plugin called code-ref-checker. It’s still a work in progress, but we’re happy with the early results (notice the code ref in the header):
```ts title="src/auth.ts" ref="waspc/examples/todoApp/src/auth/signup.ts:L1-14"
import { defineUserSignupFields } from "wasp/server/auth";

export const userSignupFields = defineUserSignupFields({
  address: (data) => {
    if (typeof data.address !== "string") {
      throw new Error("Address is required.");
    }
    if (data.address.length < 10) {
      throw new Error("Address must be at least 10 characters long.");
    }
    return data.address;
  },
});
```
An additional benefit is that, besides ensuring code examples in the docs don't become stale, it forces us to test every feature, because when we write documentation and add a code example, it can’t exist without implementing it first inside an example app.
Making tutorials testable
We have a “Todo App” tutorial in our documentation that, before every release, we would manually review and verify to ensure it was still valid. Someone would have to execute all the steps, and once they finally finish them, they would still have to test the resulting Wasp app.
While code-ref-checker solved the examples drift, tutorials add a time dimension. They evolve as the reader builds the app: files appear, disappear, and change with each step. So we opted for a new solution.
Looking at our tutorial, each step changes the project: run a CLI command, apply a diff, and move on. We realized the tutorial basically repeats those two actions over and over.
So we built a small CLI tool integrating with the Docusaurus plugin to formalize that process:
- Each step defines an action.
- The CLI can replay all steps to rebuild the final app automatically.
- Steps are easily editable in isolation.
- That final app is then tested like any other Wasp app.
We call it TACTE, the Tutorial Action Executor.
In TACTE, each step is declared via a JSX component that lives next to the tutorial content itself, and the CLI helps us define the actions to make the process work.
To setup a new Wasp project, run the following command in your terminal:

<TutorialAction
  id="create-wasp-app"
  action="INIT_APP"
  starterTemplateName="minimal"
/>

```sh
wasp new TodoApp -t minimal
```

# ...

Start by cleaning up the starter project and removing unnecessary code and files.

<TutorialAction id="prepare-project" action="APPLY_PATCH" />

First, remove most of the code from the `MainPage` component:

```tsx title="src/MainPage.tsx" auto-js
export const MainPage = () => {
  return <div>Hello world!</div>;
};
```
TACTE is still in development, but we are planning to publish it as a library in the near future.