> Fetch the complete documentation index at: https://wasp.sh/llms.txt
---
# Accessing User Data
First, we'll check out the most practical info: **how to access the user's data in your app**.
Then, we'll dive into the details of the **auth entities** that Wasp creates behind the scenes to store the user's data. For auth each method, Wasp needs to store different information about the user. For example, username for [Username & password](https://wasp.sh/docs/auth/username-and-pass) auth, email verification status for [Email](https://wasp.sh/docs/auth/email) auth, and so on.
We'll also show you how you can use these entities to create a custom signup action.
## Accessing the Auth Fields
When you receive the `user` object [on the client or the server](https://wasp.sh/docs/auth/overview#accessing-the-logged-in-user), it will contain all the user fields you defined in the `User` entity in the `schema.prisma` file. In addition to that, it will also contain all the auth-related fields that Wasp stores. This includes things like the `username` or the email verification status. In Wasp, this data is called the `AuthUser` object.
### `AuthUser` Object Fields
All the `User` fields you defined will be present at the top level of the `AuthUser` object. The auth-related fields will be on the `identities` object. For each auth method you enable, there will be a separate data object in the `identities` object.
The `AuthUser` object will change depending on which auth method you have enabled in the Wasp file. For example, if you enabled the email auth and Google auth, it would look something like this:
**User Signed Up with Google**
If the user has only the Google identity, the `AuthUser` object will look like this:
```ts
const user = {
// User data
id: "cluqs9qyh00007cn73apj4hp7",
address: "Some address",
// Auth methods specific data
identities: {
email: null,
google: {
id: "1117XXXX1301972049448",
},
},
}
```
**User Signed Up with Email**
If the user has only the email identity, the `AuthUser` object will look like this:
```ts
const user = {
// User data
id: "cluqsex9500017cn7i2hwsg17",
address: "Some address",
// Auth methods specific data
identities: {
email: {
id: "user@app.com",
isEmailVerified: true,
emailVerificationSentAt: "2024-04-08T10:06:02.204Z",
passwordResetSentAt: null,
},
google: null,
},
}
```
In the examples above, you can see the `identities` object contains the `email` and `google` objects. The `email` object contains the email-related data and the `google` object contains the Google-related data.
:::info[Make sure to check if the data exists]
Before accessing some auth method's data, you'll need to check if that data exists for the user and then access it:
```ts
if (user.identities.google !== null) {
const userId = user.identities.google.id
// ...
}
```
You need to do this because if a user didn't sign up with some auth method, the data for that auth method will be `null`.
:::
Let's look at the data for each of the available auth methods:
- [Username & password](https://wasp.sh/docs/auth/username-and-pass) data
```ts
const usernameIdentity = user.identities.username
// Username that the user used to sign up, e.g. "fluffyllama"
usernameIdentity.id
```
- [Email](https://wasp.sh/docs/auth/email) data
```ts
const emailIdentity = user.identities.email
// Email address the user used to sign up, e.g. "fluffyllama@app.com".
emailIdentity.id
// `true` if the user has verified their email address.
emailIdentity.isEmailVerified
// Datetime when the email verification email was sent.
emailIdentity.emailVerificationSentAt
// Datetime when the last password reset email was sent.
emailIdentity.passwordResetSentAt
```
- [Google](https://wasp.sh/docs/auth/social-auth/google) data
```ts
const googleIdentity = user.identities.google
// Google User ID for example "123456789012345678901"
googleIdentity.id
```
- [GitHub](https://wasp.sh/docs/auth/social-auth/github) data
```ts
const githubIdentity = user.identities.github
// GitHub User ID for example "12345678"
githubIdentity.id
```
- [Keycloak](https://wasp.sh/docs/auth/social-auth/keycloak) data
```ts
const keycloakIdentity = user.identities.keycloak
// Keycloak User ID for example "12345678-1234-1234-1234-123456789012"
keycloakIdentity.id
```
- [Discord](https://wasp.sh/docs/auth/social-auth/discord) data
```ts
const discordIdentity = user.identities.discord
// Discord User ID for example "80351110224678912"
discordIdentity.id
```
If you support multiple auth methods, you'll need to find which identity exists for the user and then access its data:
```ts
if (user.identities.email !== null) {
const email = user.identities.email.id
// ...
} else if (user.identities.google !== null) {
const googleId = user.identities.google.id
// ...
}
```
### `getFirstProviderUserId` Helper
The `getFirstProviderUserId` method returns the first user ID that it finds for the user. For example if the user has signed up with email, it will return the email. If the user has signed up with Google, it will return the Google ID.
This can be useful if you support multiple authentication methods and you need *any* ID that identifies the user in your app.
```tsx title="src/MainPage.tsx"
import { type AuthUser } from "wasp/auth"
const MainPage = ({ user }: { user: AuthUser }) => {
const userId = user.getFirstProviderUserId()
// ...
}
```
```ts title="src/tasks.ts"
export const createTask: CreateTask<...> = async (args, context) => {
const userId = context.user.getFirstProviderUserId()
// ...
}
```
\* Multiple identities per user will be possible in the future and then the `getFirstProviderUserId` method will return the ID of the first identity that it finds without any guarantees about which one it will be.
## Including the User with Other Entities
Sometimes, you might want to include the user's data when fetching other entities. For example, you might want to include the user's data with the tasks they have created.
We'll mention the `auth` and the `identities` relations which we will explain in more detail later in the [Entities Explained](#entities-explained) section.
:::caution[Be careful about sensitive data]
You'll need to include the `auth` and the `identities` relations to get the full auth data about the user. However, you should keep in mind that the `providerData` field in the `identities` can contain sensitive data like the user's hashed password (in case of email or username auth), so you will likely want to exclude it if you are returning those values to the client.
:::
You can include the full user's data with other entities using the `include` option in the Prisma queries:
```ts title="src/tasks.ts"
export const getAllTasks = (async (args, context) => {
return context.entities.Task.findMany({
orderBy: { id: "desc" },
select: {
id: true,
title: true,
user: {
include: {
auth: {
include: {
identities: {
// Including only the `providerName` and `providerUserId` fields
select: {
providerName: true,
providerUserId: true,
},
},
},
},
},
},
},
})
}) satisfies tasks.GetAllQuery<{}, {}>
```
If you have some **piece of the auth data that you want to access frequently** (for example the `username`), it's best to store it at the top level of the `User` entity.
For example, save the `username` or `email` as a property on the `User` and you'll be able to access it without including the `auth` and `identities` fields. We show an example in the [Defining Extra Fields on the User Entity](https://wasp.sh/docs/auth/overview#1-defining-extra-fields) section of the docs.
### Getting Auth Data from the User Object
When you have the `user` object with the `auth` and `identities` fields, it can be a bit tedious to obtain the auth data (like username or Google ID) from it:
```tsx title="src/MainPage.tsx"
function MainPage() {
// ...
return (
{tasks.map((task) => (
{task.title} by {task.user.auth?.identities[0].providerUserId}
))}
)
}
```
Wasp offers a few helper methods to access the user's auth data when you retrieve the `user` like this. They are `getUsername`, `getEmail` and `getFirstProviderUserId`. They can be used both on the client and the server.
#### `getUsername`
It accepts the `user` object and if the user signed up with the [Username & password](https://wasp.sh/docs/auth/username-and-pass) auth method, it returns the username or `null` otherwise. The `user` object needs to have the `auth` and the `identities` relations included.
```tsx title="src/MainPage.tsx"
import { getUsername } from "wasp/auth"
function MainPage() {
// ...
return (
{tasks.map((task) => (
{task.title} by {getUsername(task.user)}
))}
)
}
```
#### `getEmail`
It accepts the `user` object and if the user signed up with the [Email](https://wasp.sh/docs/auth/email) auth method, it returns the email or `null` otherwise. The `user` object needs to have the `auth` and the `identities` relations included.
```tsx title="src/MainPage.tsx"
import { getEmail } from "wasp/auth"
function MainPage() {
// ...
return (
{tasks.map((task) => (
{task.title} by {getEmail(task.user)}
))}
)
}
```
#### `getFirstProviderUserId`
It returns the first user ID that it finds for the user. For example if the user has signed up with email, it will return the email. If the user has signed up with Google, it will return the Google ID. The `user` object needs to have the `auth` and the `identities` relations included.
```tsx title="src/MainPage.tsx"
import { getFirstProviderUserId } from "wasp/auth"
function MainPage() {
// ...
return (
{tasks.map((task) => (
{task.title} by {getFirstProviderUserId(task.user)}
))}
)
}
```
## Entities Explained
To store user's auth information, Wasp does a few things behind the scenes. Wasp takes your `schema.prisma` file and combines it with additional entities to create the final `schema.prisma` file that is used in your app.
In this section, we will explain which entities are created and how they are connected.
### User Entity
When you want to add authentication to your app, you need to specify the `userEntity` field.
For example, you might set it to `User`:
```ts title="main.wasp.ts"
import { app } from "@wasp.sh/spec"
export default app({
name: "myApp",
wasp: { version: "^0.25" },
title: "My App",
head: [""],
auth: {
userEntity: "User",
// ...
},
// ...
})
```
And define the `User` in the `schema.prisma` file:
```prisma title="schema.prisma"
model User {
id Int @id @default(autoincrement())
// Any other fields you want to store about the user
}
```
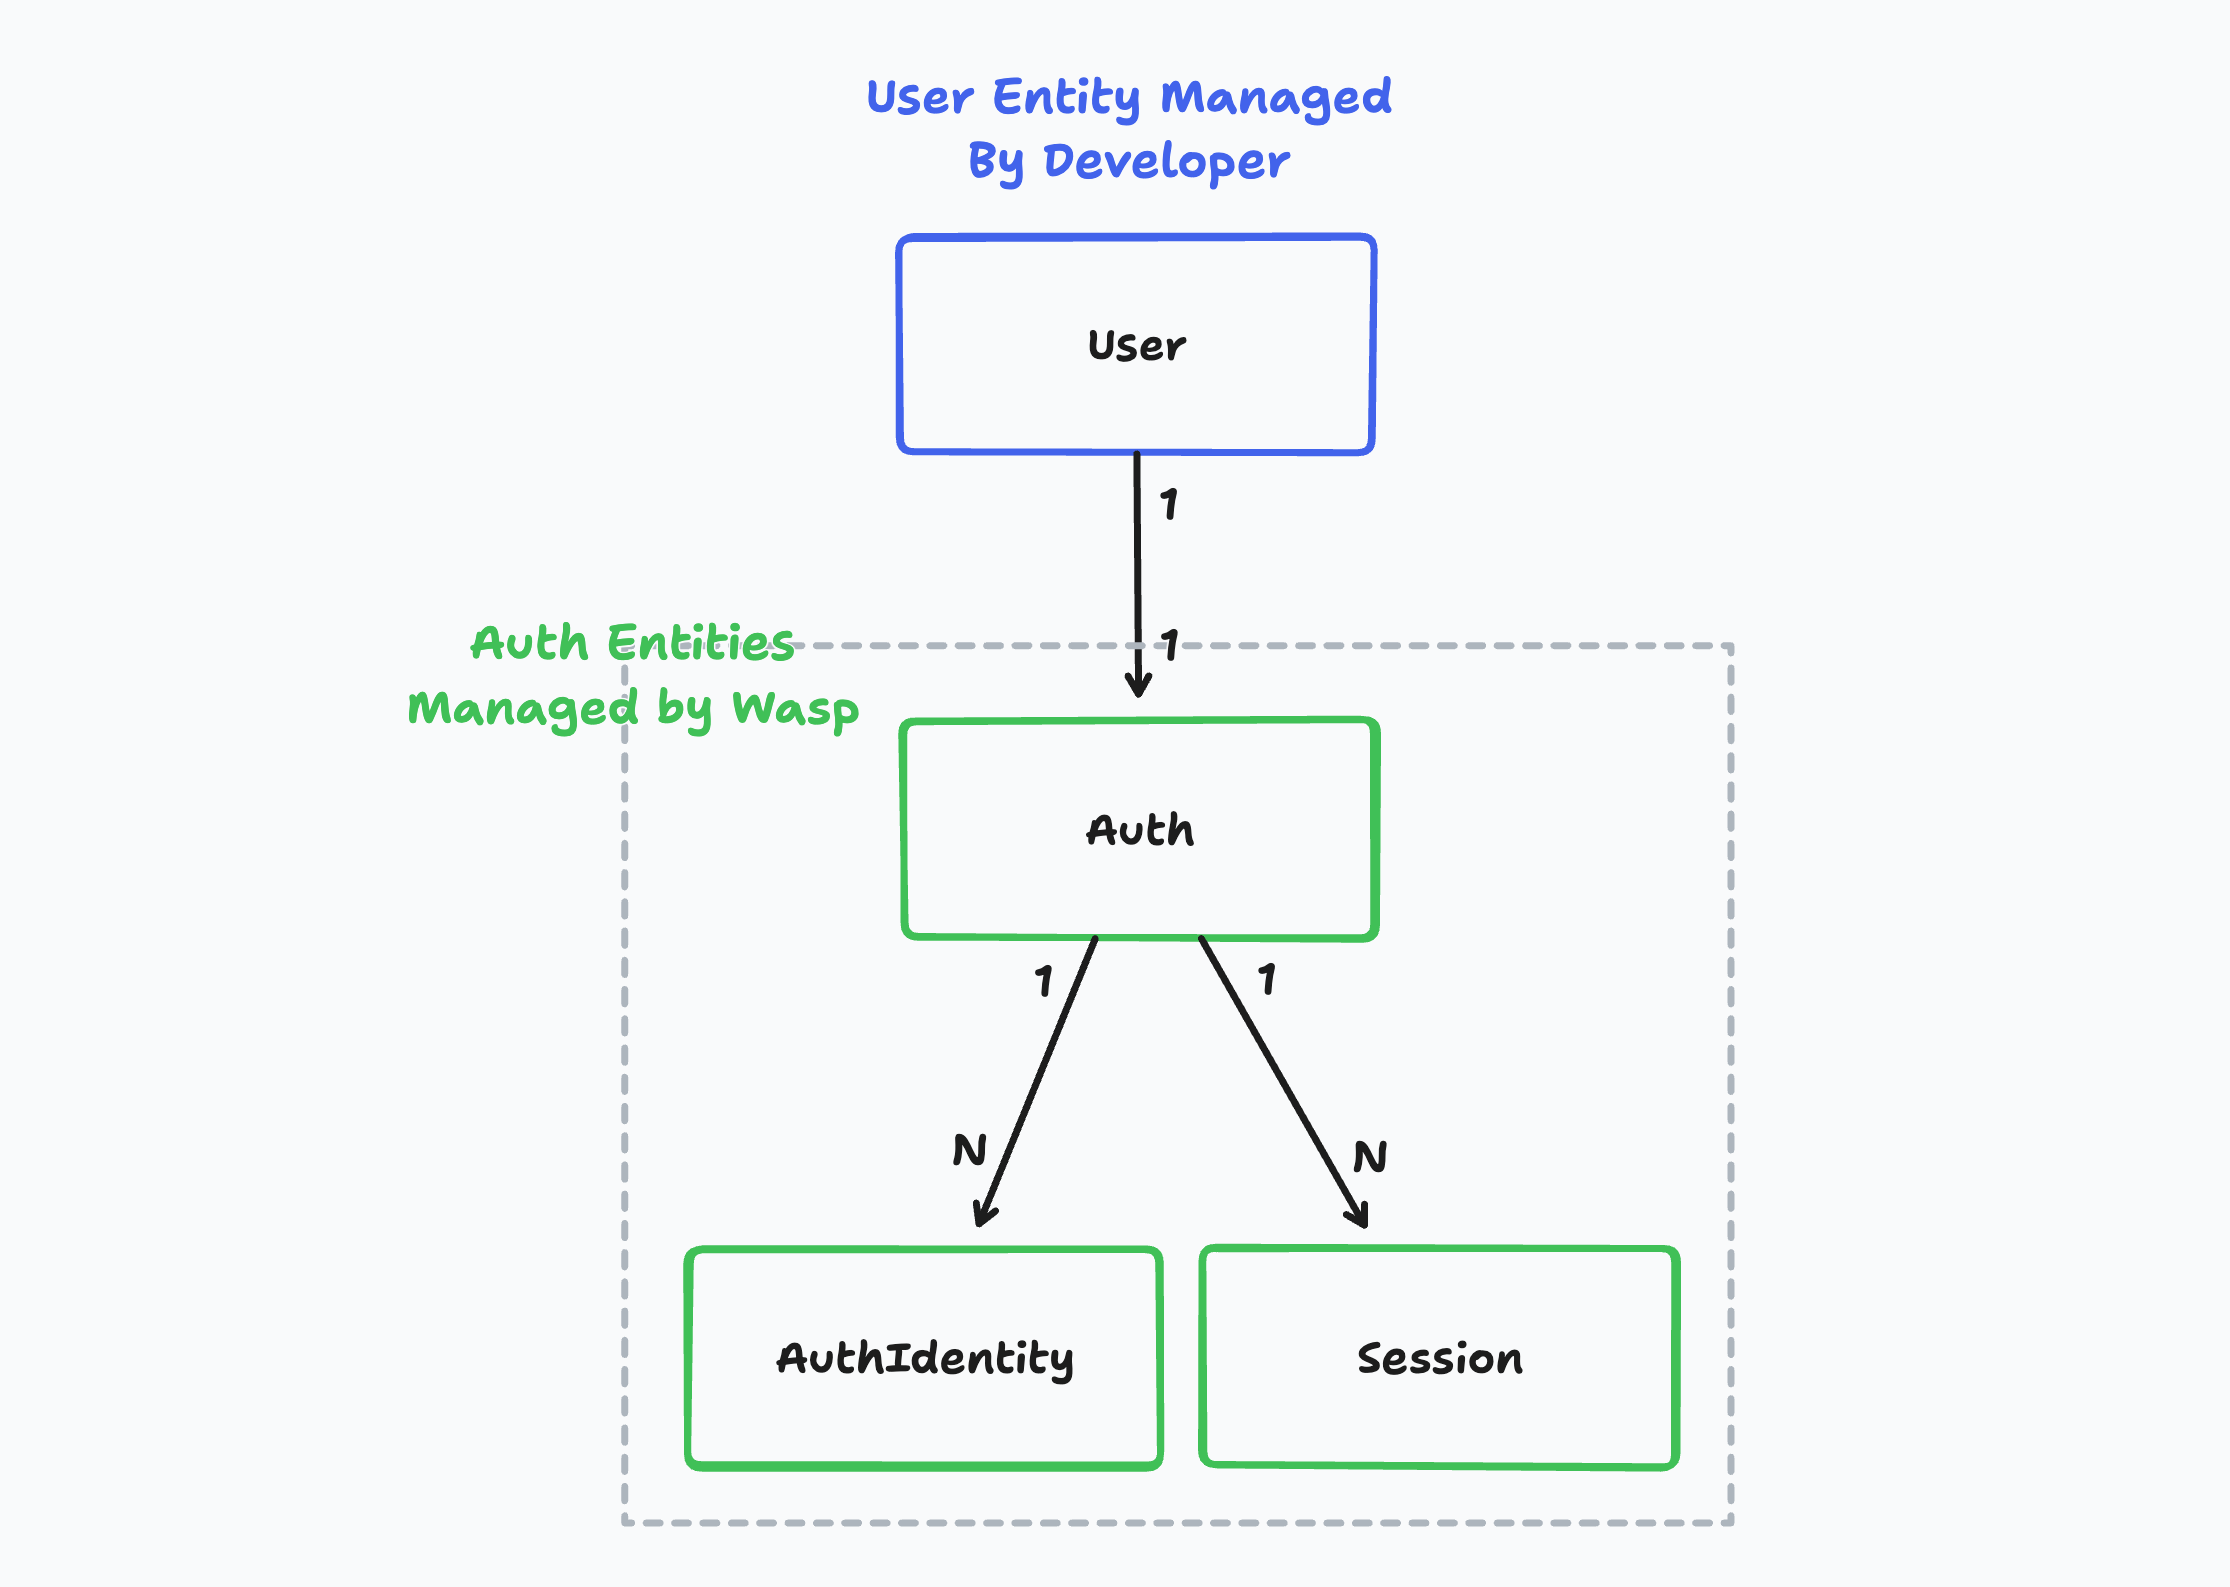
The `User` entity is a "business logic user" which represents a user of your app.
You can use this entity to store any information about the user that you want to store. For example, you might want to store the user's name or address.
You can also use the user entity to define the relations between users and other entities in your app. For example, you might want to define a relation between a user and the tasks that they have created.
You **own** the user entity and you can modify it as you wish. You can add new fields to it, remove fields from it, or change the type of the fields. You can also add new relations to it or remove existing relations from it.
Auth Entities in a Wasp App
On the other hand, the `Auth`, `AuthIdentity` and `Session` entities are created behind the scenes and are used to store the user's login credentials. You as the developer don't need to care about this entity most of the time. Wasp **owns** these entities.
In the case you want to create a custom signup action, you will need to use the `Auth` and `AuthIdentity` entities directly.
### Example App Model
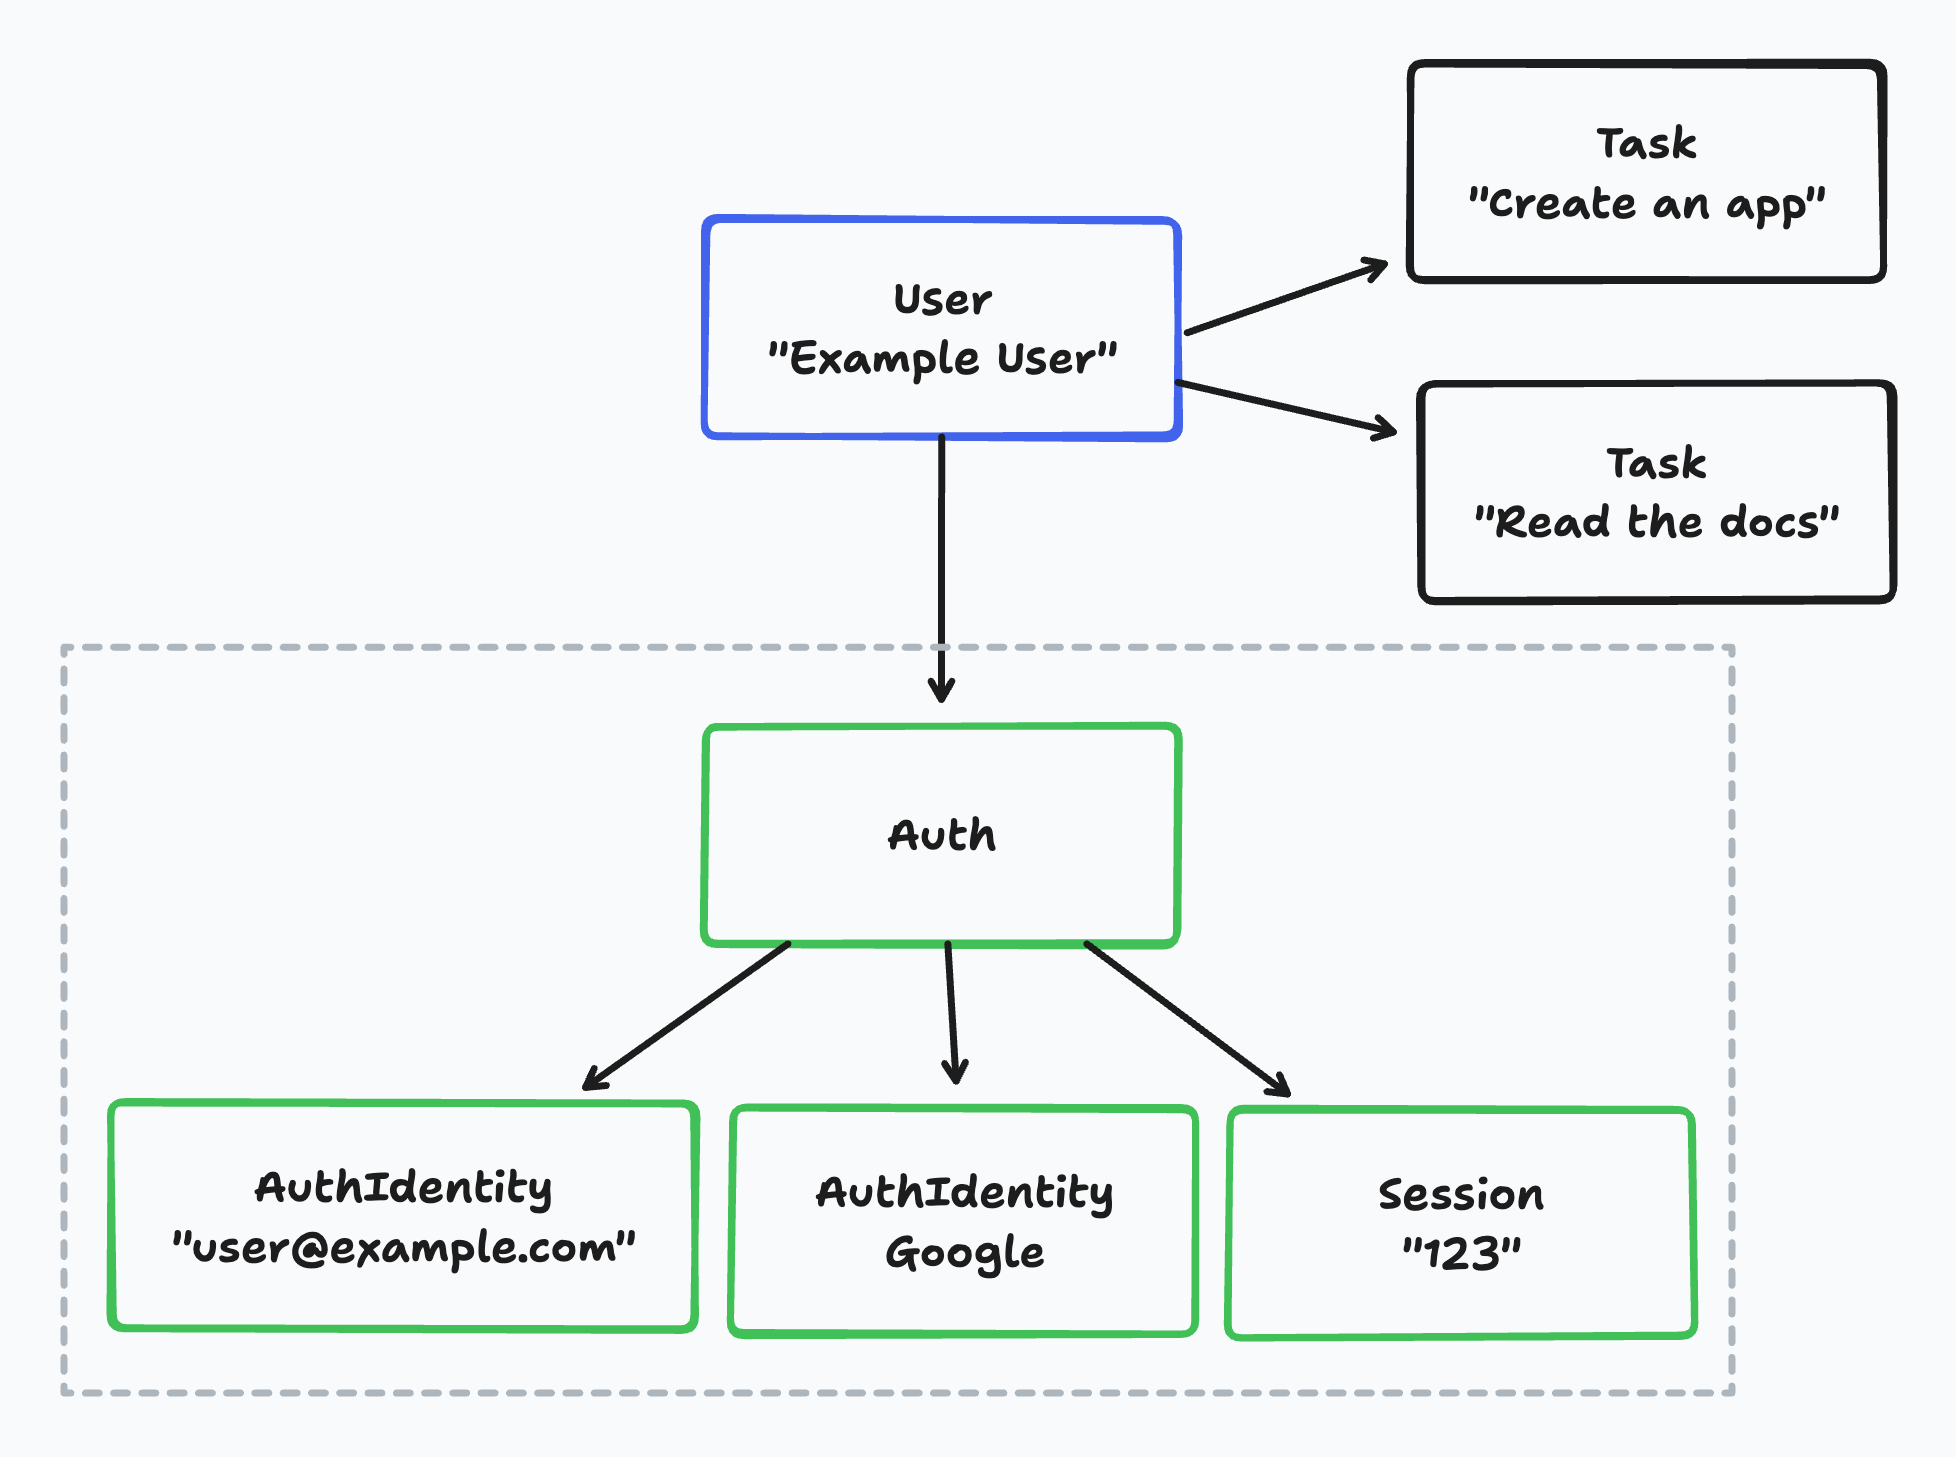
Let's imagine we created a simple tasks management app:
- The app has email and Google-based auth.
- Users can create tasks and see the tasks that they have created.
Let's look at how would that look in the database:
Example of Auth Entities
If we take a look at an example user in the database, we can see:
- The business logic user, `User` is connected to multiple `Task` entities.
- In this example, "Example User" has two tasks.
- The `User` is connected to exactly one `Auth` entity.
- Each `Auth` entity can have multiple `AuthIdentity` entities.
- In this example, the `Auth` entity has two `AuthIdentity` entities: one for the email-based auth and one for the Google-based auth.
- Each `Auth` entity can have multiple `Session` entities.
- In this example, the `Auth` entity has one `Session` entity.
:::caution[Using multiple auth identities for a single user]
Wasp currently doesn't support multiple auth identities for a single user. This means, for example, that a user can't have both an email-based auth identity and a Google-based auth identity. This is something we will add in the future with the introduction of the [account merging feature](https://github.com/wasp-lang/wasp/issues/954).
Account merging means that multiple auth identities can be merged into a single user account. For example, a user's email and Google identity can be merged into a single user account. Then the user can log in with either their email or Google account and they will be logged into the same account.
:::
### `Auth` Entity internal {#auth-entity-}
Wasp's internal `Auth` entity is used to connect the business logic user, `User` with the user's login credentials.
```prisma
model Auth {
id String @id @default(uuid())
userId Int? @unique
// Wasp injects this relation on the User entity as well
user User? @relation(fields: [userId], references: [id], onDelete: Cascade)
identities AuthIdentity[]
sessions Session[]
}
```
The `Auth` fields:
- `id` is a unique identifier of the `Auth` entity.
- `userId` is a foreign key to the `User` entity.
- It is used to connect the `Auth` entity with the business logic user.
- `user` is a relation to the `User` entity.
- This relation is injected on the `User` entity as well.
- `identities` is a relation to the `AuthIdentity` entity.
- `sessions` is a relation to the `Session` entity.
### `AuthIdentity` Entity internal {#authidentity-entity-}
The `AuthIdentity` entity is used to store the user's login credentials for various authentication methods.
```prisma
model AuthIdentity {
providerName String
providerUserId String
providerData String @default("{}")
authId String
auth Auth @relation(fields: [authId], references: [id], onDelete: Cascade)
@@id([providerName, providerUserId])
}
```
The `AuthIdentity` fields:
- `providerName` is the name of the authentication provider.
- For example, `email` or `google`.
- `providerUserId` is the user's ID in the authentication provider.
- For example, the user's email or Google ID.
- `providerData` is a JSON string that contains additional data about the user from the authentication provider.
- For example, for password based auth, this field contains the user's hashed password.
- This field is a `String` and not a `Json` type because [Prisma doesn't support the `Json` type for SQLite](https://github.com/prisma/prisma/issues/3786).
- `authId` is a foreign key to the `Auth` entity.
- It is used to connect the `AuthIdentity` entity with the `Auth` entity.
- `auth` is a relation to the `Auth` entity.
### `Session` Entity internal {#session-entity-}
The `Session` entity is used to store the user's session information. It is used to keep the user logged in between page refreshes.
```prisma
model Session {
id String @id @unique
expiresAt DateTime
userId String
auth Auth @relation(references: [id], fields: [userId], onDelete: Cascade)
@@index([userId])
}
```
The `Session` fields:
- `id` is a unique identifier of the `Session` entity.
- `expiresAt` is the date when the session expires.
- `userId` is a foreign key to the `Auth` entity.
- It is used to connect the `Session` entity with the `Auth` entity.
- `auth` is a relation to the `Auth` entity.
## Custom Signup Action
Let's take a look at how you can use the `Auth` and `AuthIdentity` entities to create custom login and signup actions. For example, you might want to create a custom signup action that creates a user in your app and also creates a user in a third-party service.
:::info[Custom Signup Examples]
In the Advanced section you can see an example for [Email](https://wasp.sh/docs/auth/advanced/custom-auth-actions#email) or [Username and password](https://wasp.sh/docs/auth/advanced/custom-auth-actions#username-and-password) authentication.
:::
Below is a simplified version of a custom signup action which you probably wouldn't use in your app but it shows you how you can use the `Auth` and `AuthIdentity` entities to create a custom signup action.
```ts title="main.wasp.ts"
import { action, app } from "@wasp.sh/spec"
import { customSignup } from "./src/auth/signup" with { type: "ref" }
export default app({
// ...
spec: [
action(customSignup, { entities: ["User"] }),
],
})
```
```ts title="src/auth/signup.ts"
import {
createProviderId,
sanitizeAndSerializeProviderData,
createUser,
} from "wasp/server/auth"
import type { CustomSignup } from "wasp/server/operations"
type CustomSignupInput = {
username: string
password: string
}
type CustomSignupOutput = {
success: boolean
message: string
}
export const customSignup: CustomSignup<
CustomSignupInput,
CustomSignupOutput
> = async (args, { entities: { User } }) => {
try {
// Provider ID is a combination of the provider name and the provider user ID
// And it is used to uniquely identify the user in your app
const providerId = createProviderId("username", args.username)
// sanitizeAndSerializeProviderData hashes the password and returns a JSON string
const providerData = await sanitizeAndSerializeProviderData<"username">({
hashedPassword: args.password,
})
await createUser(
providerId,
providerData,
// Any additional data you want to store on the User entity
{}
)
// This is equivalent to:
// await User.create({
// data: {
// auth: {
// create: {
// identities: {
// create: {
// providerName: "username",
// providerUserId: args.username
// providerData,
// },
// },
// }
// },
// }
// })
} catch (e) {
return {
success: false,
message: e.message,
}
}
// Your custom code after sign-up.
// ...
return {
success: true,
message: "User created successfully",
}
}
```
You can use whichever method suits your needs better: either the `createUser` function or Prisma's `User.create` method. The `createUser` function is a bit more convenient to use because it hides some of the complexity. On the other hand, the `User.create` method gives you more control over the data that is stored in the `Auth` and `AuthIdentity` entities.